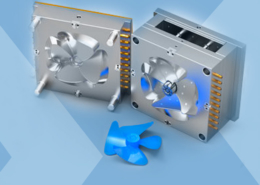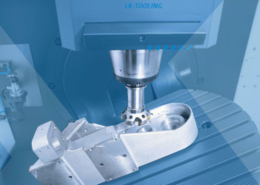
INJECTION MOULDING
Injection moulding parts and injection tools. Full solutions from design to production.
What Can You Make From Injection Molding: Products and ... - products made by in
Author:gly Date: 2024-10-15
With a complete part, there will be flash (excess material at the seams of the mold), part lines, sprues and air holes all over the part. The sprues and air holes can be cut or carefully broken away. There will be a mark where these were connected to the part, they can be smoothed away by light sanding. The flash can be cut away with a razor blade and also sanded down smooth. Once the part is cleaned enough, there is the replica or final part. Some items or parts may require some slight deviation from the steps mentioned here, but all items should be able to be formed under the same principles.
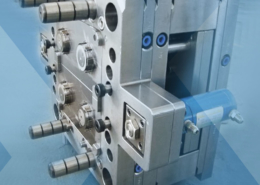
Two-shot injection molding defects often occur in the shut-off areas where the second shot mold seals against the first shot, or the substrate.
Two-shot design can deliver a competitive advantage far above other molding processes, especially for complex parts. Learn the benefits of the process and explore the special design requirements needed to make it work in this free guide created by engineers, for engineers.
Place the pancake-like clay onto a piece of chipboard. Place the item to be molded into the middle of the clay. The part may need to be slightly recessed into the clay; if so, remove some clay from the middle to allow this to happen. Other parts like the one seen here can simply sit on the surface of the clay. Once the part is positioned, smooth the clay up to the edge of the part, making a seal with the clay and part. This will prevent any silicone from getting underneath the part. Take a small tipped item, such as the back end of a small paint brush or dull pencil, to make small key holes close to the part. Repeat this with a larger diameter object around and outside of the smaller key holes. These key holes allow for the two halves of the mold to line up properly and not slide or move during the curing process of the part.
Then place that box around the part in the clay, applying enough pressure to make an indentation or mark in the clay. Remove the box and cut the clay at the marks that were left behind. Once the clay is cut to size, again place the box around the part and now around the cut clay. If done properly, the clay should fit snuggly in the box. Now the box must be secured in place with clay on the outside. Take a chunk of clay and roll it into a long piece, wrap the clay around the base of the box and smooth the clay to the side of the box and the chip board.
Like most plastics manufacturing processes, injection molding has its share of problems and solutions. Same goes for two-shot injection molding — and there’s even more complexity. The key areas to consider when troubleshooting injection molding defects are captured in our Two-Shot Injection Molding Design Guide. Be sure to download your copy today. In the meantime, here are some common two-shot molding defects – and how to avoid them.
If the two materials are somewhat compatible and you simply need to increase the strength of the bond, try maximizing the surface area in the transition zone.
Now that the item is fully prepared, estimate or measure how much volume will be needed for the first half of the pour. Be sure the make the pour at least half inch thick from the tallest point of the part but careful not to cover the top of the sprue or air holes, if they are covered completely by the silicone, the holes can be cut open after this half of the mold is fully dry. Mix the proper amount of silicone material (here we mixed a 1:1, meaning half of the volume is part A and the other half is part B) and ensure it is mixed thoroughly. Pour a small amount of the silicone onto the part, just enough to cover the part, and then take a small brush and “paint” the silicon onto the part. This should remove any bubbles on the surface of the part. Resume pouring the silicone into the box. If poured from a distance, the silicon makes a thin stream, forcing any large bubbles to be removed. Allow for the silicone to sit and dry for the required time (indicated on the container of the material purchased).
With the box secure, smooth the clay to the inside of the box, as was done with smoothing the clay to the part, preventing any silicone from getting between the clay and the box. Depending on the orientation and design of the item, it may be ideal to add a sprue (pouring spout) and air holes (to allow the air in the mold to escape) now or on the other side of the item. The side that these are best on is decided by the user. Keep in mind, the spot that these are placed will have a mark and need to be cleaned up or sanded for removal. To make the sprue, take a conical item (here a dull end of a pencil is used) and glue to the location where the plastic resin will enter the part. Air holes are placed anywhere. There is concern of a bubble forming that would prevent the plastic resin from flowing into place. The air holes can be anything from toothpicks to wire to coffee straws. These are also glued into the desired locations. Wait for the glue to dry before proceeding.
Do you ever need spare plastic parts, or need to replace a broken or worn part, such as a plastic cap or a door bell switch? Do you ever want to make multiples of a favorite model, like model car parts, or change something from a foam/clay design to a plastic component? These can all be done by resin casting, which is to make a mold of the desired item and then pour plastic resin into that mold.
Once poured, lightly tap the mold to help move any bubbles that may be stuck, pour a little more mix if the sprue level drops from air release. Let resin harden for time determined by manufacturer. Remove rubber bands and slowly separate mold halves, careful not to break cast part when removing the sprue and runner from the mold. If segments of the mold did not completely fill with plastic resin, then either air was trapped or the mold was squeezed too tight. Try again with light rubberband hold and more tapping.

While it’s easier to write about, it’s actually a little more time-consuming in real life and there are many steps to the process. The desired item must be prepared for the mold, the mold and the resin for the part must be poured, and the final part must be cleaned for best results.
Place the two halves of the mold together matching up the keys that were made into the mold halves. Secure with one or more rubber bands, being sure not to over-tighten the bands. The two halves should simply be held together; do not squeeze or deform the mold. Place the side with the sprue and air holes face up. Based on the part that was molded, estimate or measure the amount of plastic resin needed to be mixed (here is a 1:1 mix ratio resin). If specific color is required, add coloring to the mix. Slowly pour the mix into the sprue. Slow pour is necessary to allow time for air to escape the mold.
Use a mold release to coat the exposed silicone. This prevents the new pour of silicone from merging with the current pour. Here, a liquid mold release is used. If any of the mold release gets on the part, gently wipe or clean it off. Multiple coats of mold release may be used.
It is not necessary but may help keep the box stable when pouring; the box can be secured again to the chipboard with clay, but with the side that had the clay removed face up. As before, estimate or measure the amount of silicone material needed and proceed as before. Once the second half of the mold has solidified, remove any clay that may be securing the box, and remove the box from the mold. If enough mold release was used, the mold halves should separate easily. Carefully remove the part from the mold, taking care to notice the sprue and air hole components. The mold itself is now ready for casting a part.
The item can be anything from an already existing plastic part, to a piece of foam that was carved and shaped to make a custom piece for cosplay (or even a 3D printed part you would like to make more of). Whatever the origin of the item, they are all prepared the same way. The first step is to get a chunk of clay prepared; this chunk of clay should be a little bigger than the item to be molded while maintaining about 0.5 inch thickness. Starting with more clay than needed is better than not enough. The clay should be kneaded in order to prevent any imperfections in the clay surface. Kneading also warms the clay up, making it easier to manipulate. Once the kneading is done, roll the clay into a ball. Place the ball of clay on a smooth, clean surface and use the rolling pin to flatten. The clay should not be attempted to be flattened all at once; it should be done little by little. Each time the rolling pin is used, the clay should be flipped over and rotated about ¼ a turn for a more even distribution. When the clay is getting close to the desired thickness, use some popsicle sticks stacked up on each side of the clay to allow the rolling pin to give a perfectly smooth and level surface.
Cause: Unfortunately, all tab gates produce this defect, known as vestige, on the surface of the part. They’re somewhat of a necessary evil.

Cause: Usually a poor seal between the first shot and the second shot mold. Or, the material is too thin in the shut-off area.
As discussed in our Two-Shot Injection Molding Design Guide, the type of gate, its design, and location must be carefully considered to achieve the ideal cosmetic appearance and dimensions of your part. In single-shot injection molding, the gate is typically located so that the melt enters at the thickest part of the cavity and then flows to the narrower areas. Its placement in two-shot isn’t as straightforward.
To make a box for the mold, take measurements of the length and width of the part in the clay. Add 1 inch to the measurement. This will give a 0.5-inch border all the way around. Cut a strip of foam board to a desired thickness; this thickness should be at least two times the height of the part that is sticking out of the clay, but not too tall. The foam board strip should be marked to the measurements of the border needed. Alternate the measurements, i.e., 3-in, then 4.5-in, then 3-in and again 4.5-in. At these marks, score one side of the foam board. This score or cut should not go all the way through the board. This will allow for the board to be folded at these marks. Tape the ends together to form a four-sided box.
Incorporate an accent groove, 1.5 mm – 2.0 mm deep and 0.8mm – 1.0mm wide, in the first shot profile along the edge of the second-shot.
Solution: The solution to the first-shot vestige is quite simple – position it so that the second shot material covers it! The second-shot vestige, however, will require additional processing after the mold cycle. The only way around the vestige all together is to use a hot tip gate, depending on the part design.
Solution: Create a sharp transition between the first and second shot materials in the shut-off areas. To accomplish this, incorporate a step or accent grove into your design:
Now that the silicone has dried, remove the clay that is securing the box to the chipboard. Flip the box over — it may resist a bit due to the clay sticking to the chipboard — and carefully remove the clay that was once the bottom. Be careful not to remove or disturb the part while removing the clay. Clean any clay off the part that may have been left behind without moving the part. If a sprue and air holes were not set up on the first pour, this is the time to do so on this side.
As for any engineered plastic part, material selection is paramount. Typical considerations include mechanical and physical properties, , heat, electrical, flammability and chemical and UV resistance. For two-shot, if we’re to avoid defects, we must take it a step further and consider the compatibility between the first shot and second shot material.
Jaycon Systems specializes in bringing products to life by offering a complete service line that takes product concepts to mass production.

Our offerings range from product and electronics design to prototyping and manufacturing. We apply our knowledge of technology to most markets, among them consumer electronics, computer hardware, marketing/multimedia, and environment. With our entrepreneurial spirit and as a rapid-prototyping firm, we believe in building products right the first time and introducing them quickly to market. For more, visit jayconsystems.com
LK-Mould Ltd.,
No.15, JinShen Road, Jin xia District
Changan Town, Dongguan
523850 Guangdong
China