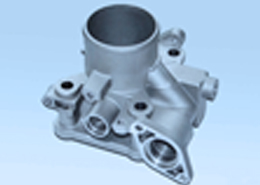
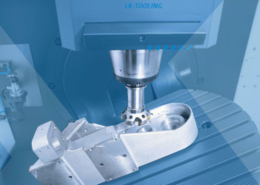
INJECTION MOULDING
Injection moulding parts and injection tools. Full solutions from design to production.
Prototype Injection Molding | Custom Plastic Manufacturing - prototype molding s
Author:gly Date: 2024-10-15
Don’t have that kind of time or money? No worries, that’s what contract manufacturers like Protolabs are for—quick-turn injection molding. Just follow some basic design guidelines, and understand that the threads found on molded parts are a bit different than the ones made in a machine shop. This design tip explores these considerations.
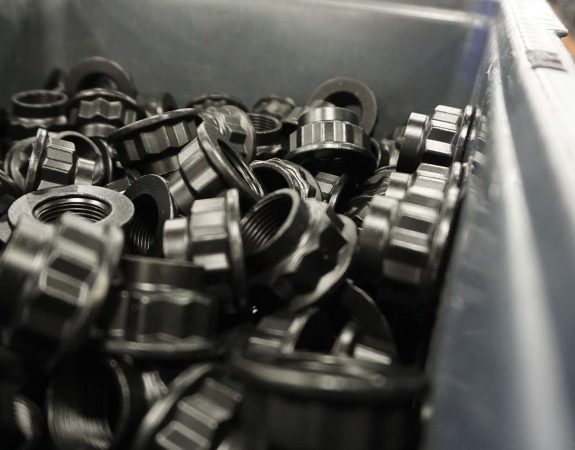
Originally, screw threads were designed for metal parts, though molded threads on plastic parts are now also common, as seen here on this threaded bolt. Just carefully consider thread size and pitch when designing your part to avoid threads that might strip more easily than metal counterparts.
Also, consider setting aside the standard thread forms defined in your Machinery’s Handbook or Guide to World Screw Threads. That’s what the folks who design mass-produced peanut butter jar lids and iced tea bottle caps have done, and as long as you’re designing the mating part and there’s no need to join with standard, off-the-shelf components, there’s nothing stopping you from doing the same.
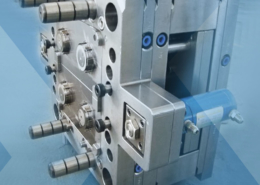
On external threads, bear in mind that the form may also be…well, incomplete. In order to create tooling and mold parts in as fast as 1 day, Protolabs mills all mold cavities on one of its machining centers using a ball or square-nose end mill. Because of the way in which the cutter traverses the cavity, a slight undercut will occur roughly 10 degrees to either side of the parting line.
Another consideration, at least on external threads, is the parting line—Protolabs will always place it lengthwise down the exact center of the thread, essentially cutting the mold into two equal halves. As discussed, there will be some undercutting of the thread form, unless you opt for a side-action mold, in which case some slight flashing can occur where the different mold sections come together. Again, it’s not much, but designers should always know what to expect before committing to a manufacturing solution.
Once the initial costs of the molds are covered, the cost per unit during manufacturing is relatively low. Typically, you can expect the cost per part to range from $0.20 to $10.00 per piece or higher, depending on the quantity.
How much will my injection molding project cost?Estimate the cost of your injection molding project with us. HLH Rapid has over 20 years of experience in building custom tools and plastic injection moulded parts for engineers and industrial designers in a wide range of industries from automotive, medical, electronic devices and more. We can build low-cost and high quality tools from a wide range of material grades and well designed tools.To get started, simply submit your 3D drawings and project details to our site submission form to get a free injection moulding quote or to speak with an expert from our engineering team.
So, how much can you expect injection molding to cost? Injection molding projects can cost anywhere from $10,000 or less to $100,000. The total cost of injection molding quote is essentially made up of two parts: mould cost + part cost.
Quantity of parts required will impact two fold, first in the tool design itself. If you are looking at very high numbers of parts it might make sense to go with multi-cavity tools, which are larger and more expensive but will bring part costs down. Also the higher the quantity required the better the steel used to machine the cavity, core and inserts will need to be. Low quantities can often be realized using low grade steels or aluminiums’ bringing costs down.
There are several things you can do to help lower the overall per part cost. The top tips to reduce the injection moulding per part costs include:
Finally, don’t forget that there’s more than one way to skin the proverbial cat. If finding the perfect threaded-part design eludes you, remember that Protolabs might be able to machine your threads in a secondary operation more cost-effectively than trying to mold them, at least on smaller quantities. You could also consider using self-tapping screws or an overmolded thread insert as an alternative.
Molded threads are everywhere. On the cap of a soda bottle. On the nut that attaches the drain pipe to the underside of the kitchen sink. On those weird-looking screws used to assemble a child’s jungle gym. These are just a few examples of the mass-produced plastic parts we encounter every day, parts that were made using multi-cavity, highly automated molds costing hundreds of thousands of dollars and requiring many months to design and manufacture.
The injection molding mold cost is also known as the tooling cost. Tooling refers to the design and manufacturing of the mold used to create injection-molded parts and is often the most expensive component of an injection molding project. Simple molds are typically in the $3,000 to $6,000 range while the price for larger, more complex, higher-production / steel moulds, or multi-cavity moulds can cost from $7,000 and up.
The most common materials used to make molds are steel and aluminum, with steel lasting longer. While it’s often said that aluminum costs less, this is not always the case. High-quality but low-cost Chinese steel grades, such as S50C and P20, suitable for rapid tooling and low-volume production purposes, can serve as cheaper alternatives to aluminium.
Internal threads are another matter. In order to keep tooling costs low and speed delivery time, Protolabs uses hand-loaded inserts to create internal threads. These must be unscrewed from the workpiece at the end of each molding cycle using a special hex key machined into the end of each insert. Yes, this does take a little time, which, in turn, drives up part costs slightly. It’s for this reason that the number of internal threads per part are limited to two, and their size is limited as well—at Protolabs, internal threads can be no larger than 2.75 in. (70mm) in diameter, and no smaller than the 0.3 in. (7.6mm) minimum already mentioned. The threads should also be located at or near the end of the insert, lest the insert become irretrievably stuck in the workpiece after molding.

Our helpful design aid demonstrates part features that are too thin or too thick, bad bosses, right and wrong ribs, and other considerations to be mindful of while designing parts for injection molding.
Injection molding is a manufacturing process widely known for its ability to produce parts cost effectively and consistently. While the process comes with significant cost benefits, unlike 3D printing and CNC machining, it demands a high level of ‘financial commitment.’ In this article we will go through
This might sound like a lot, but it’s hardly noticeable except on very large or coarse threads. For these, it might be necessary to remove the undercuts using a “half thread” design, although this will reduce thread strength slightly and may make the threads a bit less free-running, depending on what they screw into. One way around this is to design the mold with cam-activated side-actions, which eliminate undercuts and provide a fully formed thread. Be aware that this approach drives up the initial tooling cost, so be sure to discuss whether it’s really needed with a Protolabs applications engineer.
Cycle time or injection moulding time includes setup and running time for each part, this is where the manufacturer’s overheads are. More intricate designs, parts with complex features or larger parts may slow down the time it takes to remove the part from the mold, increasing overall cycle time and costs. Keep in mind that a high-viscosity will require longer injection and cooling time.
This is largely determined by the complexity and size of the mold, the number of cavities in the mold, and the level of precision required. Undercuts mean side actions, sliders and lifters which means added complexity, more work and higher costs. If you can reduce these features as much as possible and keep your design simple, you will significantly save on lead time and costs.
Let’s face it: Screw threads were originally designed for metal parts, and were standardized long before plastic injection molding became mainstream. This has created a few challenges for plastic part designers. The first is that the classic, 60-degree V-style thread seen in the fastener aisle of your local hardware store is relatively shallow. This isn’t a problem when parts are made of strong, tough metal. But those made of plastic tend to strip more easily, especially on fine pitch threads or those the size of a pencil or smaller. That’s why Protolabs recommends that internal threads should be no smaller than 0.3 in. (7.6mm) in diameter, and recommends using the coarsest pitch possible (regardless of size) for your design.
So whether you’re designing threaded medical components, screw-together electronics housings, threaded drive mechanisms, or any other plastic injection-molded parts, Protolabs can provide plenty of advice to get your threads pointed in the right direction. Upload your design, review the moldability analysis provided with each part quote, and contact an applications engineer if you need to. You’ll be threading the plastic injection molded part needle in no time.
To get started, simply submit your 3D drawings and project details to our site submission form to get a free injection moulding quote or to speak with an expert from our engineering team.
There are several things you can do to help control and lower costs when it comes to mould making. The top tooling cost reduction tips include:
Proto Labs, Inc. 5540 Pioneer Creek Dr. Maple Plain, MN 55359 United States P: 877-479-3680 F: 763-479-2679 E: [email protected]
Estimate the cost of your injection molding project with us. HLH Rapid has over 20 years of experience in building custom tools and plastic injection moulded parts for engineers and industrial designers in a wide range of industries from automotive, medical, electronic devices and more. We can build low-cost and high quality tools from a wide range of material grades and well designed tools.
Our digital factories create prototypes and low-volume parts fast, while our manufacturing network, offers advanced capabilities and volume pricing.
Aside from the issues discussed so far, success with plastic injection molding requires designers to follow the “best practice” rules covered in other Protolabs design tips, and threaded parts are no exception:
As mentioned, if you have questions or concerns, feel free to contact one of Protolabs’ applications engineers at 877-479-3680 or [email protected] to discuss options.
The use of hand-loaded inserts presents another small limitation: material choice. Many engineering-grade polymers, especially those that are glass or fiber-filled, are a little “sticky,” making it difficult for a human to remove the insert just described. To keep production rolling along smoothly, any molded parts with internal threads should be made of ABS, POM (Delrin), or nylon. Avoid glass-filled and high-temp materials. No such limitation exists for external molded threads.
Plastic pellet resins used in injection molding can range from $1 per kg to $5 per kg or higher, depending on the type of material. Specialty materials, such as glass-filled polymers or elastomers used to achieve specific properties, will typically incur higher costs. To reduce costs, stick to readily available, easy to process material like PP or ABS as far as possible.
Achieving specific textures or finishes by applying an SPI or VDI finish on the molded part can will impact the costs of your tool. High polished or transparent finishes require both better quality steels and much more work to achieve than a standard polish. To keep costs down, only requests high quality finishes where necessary.
In addition, designing molded threads or threaded bosses as features for larger molded parts may be something you’ll want to consider. Designing plastic screw bosses is fairly straightforward, but there are a few things to keep in mind to ensure a strong connection between parts and to mitigate cosmetic defects.
Get machined parts anodized and chromate plated with our quick-turn finishing option. Eligible materials include aluminum 6061/6082 and 7075.
Any additional processes such as assembly, post-molding treatments, or finishing, will increase the unit cost. To keep molding costs and time and down, if it can be done in the tool itself, you should work with your supplier to try and achieve it that way.
This guide walks you through everything from quoting, design analysis, and shipment to best practices that ensure your model is optimized for molding.
Tough Black (Loctite Henkel 3843) and Ceramic-Filled (BASF 3280) are two new advanced photopolymer materials now available for 3D printing.
Injection molding is a manufacturing process widely known for its ability to produce parts cost effectively and consistently. While the process comes with significant cost benefits, unlike 3D printing and CNC machining, it demands a high level of ‘financial commitment.’ In this article we will go through How much does injection molding cost?So, how much can you expect injection molding to cost? Injection molding projects can cost anywhere from $10,000 or less to $100,000. The total cost of injection molding quote is essentially made up of two parts: mould cost + part cost. Mold Cost (Tooling Cost)The injection molding mold cost is also known as the tooling cost. Tooling refers to the design and manufacturing of the mold used to create injection-molded parts and is often the most expensive component of an injection molding project. Simple molds are typically in the $3,000 to $6,000 range while the price for larger, more complex, higher-production / steel moulds, or multi-cavity moulds can cost from $7,000 and up. Factors that determine tooling costs in injection molding include:1. MaterialsThe most common materials used to make molds are steel and aluminum, with steel lasting longer. While it’s often said that aluminum costs less, this is not always the case. High-quality but low-cost Chinese steel grades, such as S50C and P20, suitable for rapid tooling and low-volume production purposes, can serve as cheaper alternatives to aluminium. 2. Machining TimeThis is largely determined by the complexity and size of the mold, the number of cavities in the mold, and the level of precision required. Undercuts mean side actions, sliders and lifters which means added complexity, more work and higher costs. If you can reduce these features as much as possible and keep your design simple, you will significantly save on lead time and costs. 3. QuantityQuantity of parts required will impact two fold, first in the tool design itself. If you are looking at very high numbers of parts it might make sense to go with multi-cavity tools, which are larger and more expensive but will bring part costs down. Also the higher the quantity required the better the steel used to machine the cavity, core and inserts will need to be. Low quantities can often be realized using low grade steels or aluminiums’ bringing costs down. 4. TexturesAchieving specific textures or finishes by applying an SPI or VDI finish on the molded part can will impact the costs of your tool. High polished or transparent finishes require both better quality steels and much more work to achieve than a standard polish. To keep costs down, only requests high quality finishes where necessary. Tips to reduce injection mold tooling costsThere are several things you can do to help control and lower costs when it comes to mould making. The top tooling cost reduction tips include: Getting rid of undercuts as they make the tooling process more complicated and costly.Only specify tolerance where necessary.Only requests high quality textures and finishes where necessary.Planning ahead to determine the quantity required to optimize the selection of tooling type (multi-cavity, etc.) and material grade (low-grade aluminium or steels, etc.).Consider Chinese mold manufacturers for steel tooling. Part CostOnce the initial costs of the molds are covered, the cost per unit during manufacturing is relatively low. Typically, you can expect the cost per part to range from $0.20 to $10.00 per piece or higher, depending on the quantity. Factors that determine injection molding part unit costs include:1. MaterialPlastic pellet resins used in injection molding can range from $1 per kg to $5 per kg or higher, depending on the type of material. Specialty materials, such as glass-filled polymers or elastomers used to achieve specific properties, will typically incur higher costs. To reduce costs, stick to readily available, easy to process material like PP or ABS as far as possible. 2. Cycle timeCycle time or injection moulding time includes setup and running time for each part, this is where the manufacturer’s overheads are. More intricate designs, parts with complex features or larger parts may slow down the time it takes to remove the part from the mold, increasing overall cycle time and costs. Keep in mind that a high-viscosity will require longer injection and cooling time. 3. Secondary OperationsAny additional processes such as assembly, post-molding treatments, or finishing, will increase the unit cost. To keep molding costs and time and down, if it can be done in the tool itself, you should work with your supplier to try and achieve it that way. Tips to reduce the injection molding per part costsThere are several things you can do to help lower the overall per part cost. The top tips to reduce the injection moulding per part costs include: Simplify part geometry to facilitate easier mold release and less wastage.Consider standard resins over specialty materials unless specific properties are essential.Design parts with finishes in mind to minimize additional post-processing steps.
LK-Mould Ltd.,
No.15, JinShen Road, Jin xia District
Changan Town, Dongguan
523850 Guangdong
China