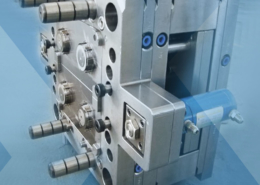
INJECTION MOULDING
Injection moulding parts and injection tools. Full solutions from design to production.
Medical Micro Molding - molding medical
Author:gly Date: 2024-10-15
For interior edges, use a radius of at least 0.5 x the wall thickness. For exterior edges add a radius equal to the interior radius plus the wall thickness to ensure constant thickness everywhere. This can also help to stop stress concentrating in the sharp corners which can cause weaker parts.
As the plastic shrinks, it applies pressure on the mold. During ejection, the walls of the part will slide and scrape against the mold, which can result to drag marks.
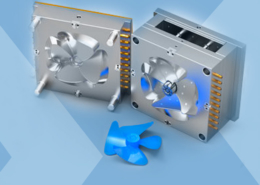
Injection moulding is a manufacturing process that melts, injects and sets plastic into a metal mould. The plastics used by injection molding processes are relatively cheap and can be used to achieve a wide variety of properties, so injection molding is popular for creating many packaging and consumer products, like LEGO!

Get 7-day standard lead times on simple parts between 0.5 in. x 0.5 in. and 4 in. x 3 in. Upload your part to see if it’s eligible.
Redesigning the part to remove undercuts or moving the part line can be possible solutions to make the design more feasible.
Once the base cools and is semi-hardened, the mold is then rotated to a new position and connected to a separate nozzle, gate, and runner system. The remaining void of the mold tool cavity is filled with TPE or TPU elastomer, creating the overmold that bonds to the substrate.
When the interior of a part solidifies before its surface, a small recess in an otherwise flat surface may appear, called a sink mark.
Overmolding is a special form of plastic injection molding. Unlike conventional molding, where a finished product is made in one cycle, overmolding requires at least one additional injection cycle using a dissimilar material. This method is also known as 2K overmolding, two-shot molding, or even multiple material molding.
Remember that overmolding is rarely used to cover the entire base substrate. Instead, apply overmolding in sections. For each of these, keep in mind these useful design tips:
The outer diameter of the boss should be 2x the nominal diameter of the screw or insert and its inner diameter equal to the diameter of the core of the screw.
While there are many advantages to insert molding, there are some potential drawbacks that designers should be aware of.

Commercially, injection moulding offers a flexible, consistent and cost-effective process of manufacturing that allows for rapid production of parts in a range of materials. Once the process has been set up and tested, machines can produce thousands of items per hour and once the mould is created (which is the most expensive element) the cost of production per component is relatively low.
When certain sections cool (and as a result shrink) faster than others, then the part can permanently bend due to internal stresses.
Bosses consist of cylindrical projections with holes designed to receive screws and other fasteners and assembly hardware, they are very common in injection moulded parts as they are used as points of attachment or assembly.
Here at UNSW we have 2 CR Clarke desktop injection moulders great for learning, testing and experimenting with the process!
If the substrate is a plastic base, then it’s customary to mold it in the same production cycle. This is done because it’s more cost-effective to make the entire finished piece at one time, rather than paying to transport and store semi-finished goods. But the more important reason is that the elastomer will adhere much better to a still-warm, semi-cured, and “sticky” substrate.
In this article, we discuss insert molding and overmolding, the advantages of each, and the applications they’re best suited for. We hope these manufacturing insights, along with useful design tips, will help you get great results on your next plastic injection molding project.
Get 7-day standard lead times on simple parts between 0.5 in. x 0.5 in. and 4 in. x 3 in. Upload your part to see if it’s eligible.
Now, if that design logic is applied to a fleet of aircraft or millions of automobiles on an assembly line, then the reduction in weight and cost becomes substantial.
Overmolding starts with a base substrate, on top of which a relatively softer TPE or TPU material is bonded. The base can be metal or plastic, although, in this article, we will focus on plastic applications primarily.
And overmolding adds cushioning and shock absorption to many common household items that might protect users from accidental injury.
The first conventional injection cycle forms the substrate, using a standard thermoforming resin. This resin fills the gate, runner, and cavity system of only one part of the mold, while the section representing the overmold is blocked.
Inserts should be used whenever a plastic case needs to be occasionally opened for service and then locked tight again, such as when performing routine maintenance or changing batteries. They cost a little more but that cost is offset by making a much more durable end product.
Overmolding uses a special type of plastic injection molding tool, one that has a cavity for the substrate portion and another separate cavity representing the overmolded section.
Inserts can be either male or female. Female inserts are used to make circular fittings inside the surrounding plastic. When these types of inserts have internal threads, they’re called nutserts. There are many advantages to using both male and female inserts to enhance a product’s appearance and utility.
To get the best results from this process, product developers should be aware of the following limitations and potential disadvantages.
The process is not limited to just two materials, and can theoretically be expanded to include an indefinite number of additional overmolds. However, in practice, more than two becomes increasingly complex and expensive.
Neither overmolding nor insert molding is restricted in their use to any particular industry or product type. Because both methods are so useful and adaptable, new practical applications are being found all the time that take advantage of their benefits. Here are a few examples:
To avoid warping and sink marks on the part as the melted material cools down it is important to have uniform wall thicknesses and avoid thick sections if possible.
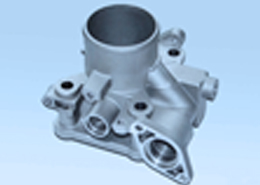
Insert molding is used to put a rubber or plastic handle on a metal part, such as you might find on hand tools or kitchen knives. And insert molding is ideal for sealing wires and electrical connectors into permanent plastic housings that block out dust and moisture.
Thick sections can lead to various issues such as warping and sinking. Reducing the maximum thickness of the design can be achieved by making the thicker sections hollow is essential. To improve the strength of these sections, ribs can be used to create structures that are of equal strength and stiffness but with reduced wall thickness and weight.
The uniform wall thickness limitations also applies to edges and corners; the transition must be as smooth as possible to ensure good material flow through the mould.
Overmolding also offers more opportunities to be creative by applying colorful designs to improve the appearance of the part as well as its performance.
This is just a partial overview of insert molding and overmolding. Are they the right solutions for you? Not sure how to apply them to your next project? Just contact our technical experts and we can offer helpful advice about how to get the best results from both processes.
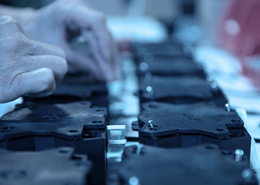
Insert molding involves placing a pre-manufactured component, such as a threaded fitting or an electrical contact, onto a mounting pin or other fixture in a plastic injection molding tool. During the molding cycle, thermoforming resin surrounds this insert and solidifies, thereby permanently sealing it into place.
Undercuts refer to part features that cannot be manufactured with a simple 2-part mould because material is in the way while the mould opens or during the ejection of the part. Avoiding undercuts all together is usually the best options as they add cost, complexity and maintenance requirements to the mould.
When 2 flows meet, small hair-like discolorations may develop. These knit lines affect the parts aesthetics, but also they generally decrease the strength of the part.
Get 7-day standard lead times on simple parts between 0.5 in. x 0.5 in. and 4 in. x 3 in. Upload your part to see if it’s eligible.
Trapped air in the mold can inhibit the flow of the material during injection, resulting in an incomplete part. Good design can improve the flowability of the melted plastic.
If sections of different thicknesses are required, make the transition as smooth as possible using a chamfer or fillet. This will allow the material to flow more evenly through the mould.
Draft angle is a taper applied to the vertical walls of the component to be moulded to assist with releasing the part. Walls without draft angle may become stuck in the mould and will have drag marks on their surface.
Injection moulding typically produces parts with tolerances of +/- 0.25mm. Tighter tolerances can be possible in certain situations but increase the cost of manufacture dramatically.
There are some unique engineering challenges that designers might face when using insert molding. The advantages of added strength and versatility must be weighed against the need for a more careful design for manufacturing review. Here are some useful guidelines to consider:
You should consider using insert molding for a few main reasons. The first is that your product application needs strong mechanical fittings to hold two or more parts together, typically for an enclosure or housing. Threaded nutserts are great for this but there are many types of snap connectors as well.
When even the maximum recommended wall thickness is not enough to meet the functional requirements of a part, ribs can be used to improve the strength and stiffness of a part.
When designing ribs, use a thickness equal to 0.5 x the main thickness, define a height smaller than 3 x the rib thickness and use a base fillet with a radius greater than 1/4 x the rib thickness. Also make sure to add draft angle!
When adding text choose embossed text over engraved text as it is more economical when creating the mould. Raising the text 0.5mm above the part surface will ensure the letters are easy to read.
Product developers should consider overmolding in order to improve the grip and texture on parts that need to be held in the hand or to protect the end user against vibration, heat, or electricity. Overmolding is also a great way to permanently bond rubber to metal, as is found on wheels and casters.

In this video, Gordon Styles, the founder and President of Star Rapid, goes into greater detail explaining how these processes work, and he gives examples of each. Be sure to check it out for more useful information.
Which process is right for you depends entirely on your application. Keep in mind that they aren’t mutually exclusive molding methods because they serve different purposes. In fact, it’s not uncommon to find both used on a single product. Think, for example, of a power tool that has overmolded grips on the handle, but that also uses nutserts to bolt the case together.
LK-Mould Ltd.,
No.15, JinShen Road, Jin xia District
Changan Town, Dongguan
523850 Guangdong
China