INJECTION MOULDING
Injection moulding parts and injection tools. Full solutions from design to production.
Delrin Plastic: Know Its Properties and Applications - delrin injection molding
Author:gly Date: 2024-10-15
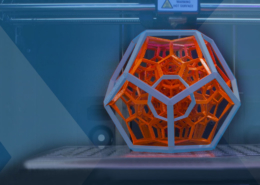
Creating custom molds using a stereolithography (SLA) 3D printer, like the Form 3, is simple and convenient, allowing you to leverage the benefits of both 3D printing and traditional molding techniques.
Adding a textured finish to the surface of TPE products can give a leather-like feel, enhancing tactile sensation and masking surface imperfections. Some textures can also adjust the surface hardness of TPE products, making them softer or harder than when made with a smooth TPE surface. If designers polish the TPE surface to a mirror finish, it may exhibit many flow lines and color streaks, or it may turn white during use, degrading the surface quality.
Now that you’ve designed and 3D printed your mold, you can mold the parts on your benchtop plastic injection molding machine.
12. Provisions for venting during the first, second, or subsequent injections need to be thought out in advance to prevent defects and ensure quality.
Building a setup for DIY injection molding does require some investment. It takes both money and time to acquire the right equipment and to master using it. However, these costs are in many cases still lower than the cost of a single metal mold, so the eventual time and cost savings, once you’re up and running, will easily offset the initial effort.
4. The sprue of a three-plate mold should ideally be designed for automatic demolding. Special attention should be paid to ensure the reliable demolding action of the soft plastic sprue.
Based on internal testing and case studies with our customers, we suggest to choose the 3D printing resin based on the criteria from the table below. Three stars means the resin is highly effective, one star is less effective.
To reduce the visibility of print lines on the finished part, print the mold with a smaller layer height (50 or 25 microns per layer instead of the default 100). Note that this increases print time.
A benchtop injection-molding machine, such as the Galomb Model-B100 or the Holipress. There are a number of benchtop injection molders on the market that vary in cost. Many of the lower cost molders use a hand-driven plunger, while some of the more expensive units use a screw or pneumatic system. Some of our customers have recommended systems from Minijector, Morgan, APSX, or Micromolder as well. Desktop automated molders such as the product line from Babyplast are good alternatives for mass production of small parts.
Setting up the print only takes a few seconds in PreForm, the print preparation software for Formlabs 3D printers. If your mold design requires support structures for printing, make sure to orient the mold halves in PreForm so that the cavity faces up. This will simplify post-processing and ensure a high-quality surface for your molded parts.
10. In 99% of cases, the hard plastic part of the product is molded first, followed by the soft plastic part, primarily because soft plastic is more prone to deformation.
Before purchase, make sure to evaluate the injection molder carefully against your production requirements. For large parts, industrial processes will still be necessary. This DIY injection molding technique is best optimized for producing small parts at low volumes.
Depending on the injected material, adhesion of the part to the mold can cause deterioration of the mold during extraction, in particular with flexible materials such as TPUs or TPEs. Using a mold release agent is a good solution to help separate the part from the mold. Silicone mold release agents are compatible with Formlabs Grey Pro Resin, High Temp Resin, and Rigid 10K Resin.
6. When designing the cavity for the second injection, some voids can be incorporated to prevent the newly formed product from being scratched or scraped by the mold. However, it’s crucial to carefully assess the strength of each sealing position to ensure that no flash occurs due to high injection pressures.
Taking TPE overmolding as an example, given the high cost of TPE material, designers must consider cost reduction during product design by using a thinner TPE wall. The tactile feel of TPE is directly related to its wall thickness and hardness. When the TPE thickness is less than 1.5mm, the softness or hardness is primarily influenced by the hardness of the underlying hard plastic. Reducing the thickness of TPE can severely affect its bonding strength with the hard plastic, mainly because an overly thin TPE cools too quickly in the mold, leading to reduced adhesion strength.
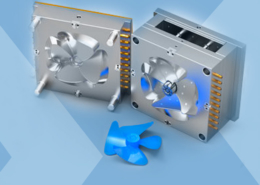
Depending on the geometry and the size, multiple molds can be printed at once on a build platform to increase printing efficiency.
As products became more intricate, the demand for tri-color and even quad-color molding began to rise. Generally, there are two types of tri-color machines: the two-station tri-color machine (colloquially known as the “pseudo tri-color”) and the three-station tri-color machine (known as the “true tri-color”). The distinction between the two isn’t about authenticity but rather the product structure design and the turntable control method adopted.
In Blender, use the eye icon in the scene explorer to toggle off one half of the mold. Once your workspace is set up to your liking, set both halves of the mold to the “wire” draw type under the Object menu, as in the image below.
5. Choosing the right material is vital. Consider factors like the material’s adhesiveness, potential deformation during injection, and risks associated with melting.
Turn the visibility of your current mold core off, and turn the other side on. Repeat the process to ensure that the object fully intersects with the inlet of the other half of the mold core. With your object lined up, you’re ready to subtract the area of two intersecting objects by using the “boolean difference” function in Blender.
Consider the desired properties of your object and the capabilities of your injection molder before you make your choice. From there, simply follow the bespoke instructions on your injection molder to quickly and efficiently produce your parts.
For prototyping and low-volume production (approximately 10-1000 parts), 3D printed injection molds provide a time- and cost-efficient solution. They also enable a more agile manufacturing approach, allowing engineers and designers to test mold designs, easily modify them, and then continue to iterate on their designs much faster, while being orders of magnitude cheaper than traditional CNC machining.
You have a wide variety of materials to choose from for injection molding. Formlabs and our customers have tested the following materials with 3D printed injection molds:
Grey Pro Resin has a lower thermal conductivity than High Temp Resin or Rigid Resin, which leads to a longer cooling time, but it is softer and can wear hundreds of cycles.
A high-performance desktop SLA 3D printer, like the Formlabs’ Form 3. The Form 3 can produce accurate molds with crisp features, and a smooth surface finish that will yield high-quality final molded parts. Beyond DIY injection molding, an SLA 3D printer is also a valuable asset for prototyping and other applications throughout product development.
2. It’s imperative to ensure that after the back mold rotates around its center, it aligns perfectly with the front mold. This aspect requires careful attention during design.
Interested in other applications of 3D printed molds? Download our white paper that also covers thermoforming and casting with elastomers.
If you have more questions about the workflow, make make sure to check our article FAQ: Injection Molding With 3D Printed Molds.
With the development of the injection molding industry, innovative techniques have emerged, pushing the boundaries of what’s possible in manufacturing. One such groundbreaking method is multi-shot injection molding. At Prototool, we’ve harnessed this advanced process, allowing for the creation of intricate and multi-material components in a single cycle. This offers unparalleled precision and design flexibility. In this article, we’ll delve into the nuances of this technique, shedding light on its benefits, design considerations, and its transformative potential in the realm of injection molding.
Want to learn more about injection molding with 3D printed molds? Download our white paper for detailed guidelines for using 3D printed molds in the injection molding process and see real-life case studies with Braskem, Holimaker, and Novus Applications.
To 3D print the mold, it’s essential to pick a material that can withstand the temperature and pressure on the mold during the injection molding process.
First, pick the CAD software tool of your preference to design the mold insert. We’ll use the open-source Blender, but the workflow should be fairly similar in any other CAD software.
Download our white paper for guidelines for using 3D printed molds in the injection molding process to lower costs and lead time and see real-life case studies with Braskem, Holimaker, and Novus Applications.
The seal position refers to the junction or boundary between hard and soft plastics. A good design avoids a “feathered” appearance (i.e., the seal position shouldn’t gradually thin out), as overly thin edges can lead to poor adhesion and warping. Ideally, the design at the seal position should have a distinct step or recess to ensure consistent wall thickness. In some products, especially those with long flow paths or areas prone to wear, mechanical connections can be designed between the soft and hard plastics, ensuring a strong bond between the two materials.
3. Before designing the mold, it’s crucial to understand the parameters of the multi-color injection molding machine intended for mass production. This includes data like maximum/minimum mold capacity, mold thickness, and the distance between ejector pins.
High Temp Resin offers a heat deflection temperature is 238 °C @ 0.45 MPa that is suitable for injection molding. This material is more brittle, but is recommended for materials with a high molding temperature and to reduce cooling time.
7. The product from the first injection can be slightly oversized. This ensures a tighter fit during the second molding, achieving a better sealing effect.
The conversation around 3D printing and injection molding is often oppositional, but it’s not always a question of one versus the other. By directly 3D printing parts or using 3D printed molds for injection molding for prototyping and low-volume production, you can leverage the benefits of both technologies. This will make your manufacturing process more time- and cost-efficient and allow you to bring products to the market faster.
Multi-shot injection molding requires a high level of process and plant resources. This plastic-making method has changed how we design and make products, making them look and work better. As industries continue to seek innovative solutions, Prototool emerges as a leader in the field, specializing in plastic products and parts manufacturing using the two-shot injection molding process and multi-shot techniques. With a commitment to precision, quality, and cutting-edge technology, Prototool is not just a manufacturer but a partner for businesses aiming for excellence. As we navigate the future of plastic manufacturing, aligning with pioneers like Prototool ensures a journey marked by innovation, efficiency, and unparalleled expertise.
In this guide, we’ll walk you through the process of DIY injection molding and share all the tools and tips necessary to utilize plastic injection molding in-house using 3D printed molds.
Now, you can position your mold. Ensure that the object fully intersects with the inlet for the molten plastic during the injection molding process. Use orthographic mode, engaged via “toggle perspective/ortho,” to make this more straightforward.
Your mold is now ready for printing. Export each half, making sure to check the “Selection Only” box in the Blender exporter.
A 3D printing material that can withstand the temperature and pressure on the mold during the injection molding process. We recommend the following materials for Formlabs SLA 3D printers:
Stay updated with the latest 3D printing news, interviews with experts from around the world and tutorials on how to leverage 3D printing.
Products made using multi-color injection molding have a significantly different structure compared to regular plastic products. When designing the structure and shape of these products, it’s essential to consider their intended use and purpose. It’s crucial to delve deep into the structural design of the injection-molded product, taking into account the compatibility features of the various materials used. Typically, the design aims to increase the contact area of the raw materials to enhance solidity. This can be achieved by incorporating numerous small recesses and protrusions within the product, which serve to increase the material’s contact area, thereby improving the product’s strength, lifespan, and practicality.
Multi-shot injection molding, also known as multi-color injection molding, refers to the process where two or more colors or different materials are molded using a mold with one or more channels. Historically, dual-color injection molding was the pioneer in this field. A common example many of us interact with daily is the toothbrush. The handle of most toothbrushes is produced using dual-color injection molding, typically combining PP (hard plastic) with TPE (soft plastic). TPE is chosen because of its excellent compatibility with PP, and the soft plastic overlay enhances the grip.
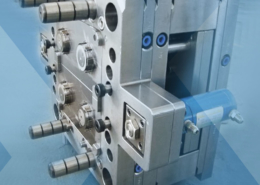
Dual-color molds typically consist of two parts. One half is fixed on the stationary platen of the dual-color injection molding machine, which is the side with the injection gate. The other half is mounted on the rotating platen, which is the side from which the mold ejects. Both molds’ rear cavities are usually identical, while the front ones differ. After the first material is injected into the first mold, the machine’s stationary and moving molds open. The rotating platen, carrying the rear parts of both molds, rotates 180 degrees. At this point, the semi-finished product from the first mold isn’t ejected. Instead, the molds close again, and the second material is injected. After cooling, the molds open, and the finished product from the first mold’s moving mold is ejected. This cycle produces one semi-finished and one finished product each time.

In the design of multi-color/multi-material injection molded products, two primary methods are used to join adjacent components:
Rigid 10K Resin is an industrial-grade, highly glass-filled material, which provides a solution that can cope with a wider variety of geometries and injection molding processes. It has an HDT of 218°C @ 0.45 MPa and a tensile modulus of 10,000 MPa, making it strong, extremely stiff, and thermally stable.
Dual-color and multi-color injection molding has become a focal point in the evolution of injection molding technology, and its benefits are manifold. Various techniques allow for different hardness and resilience within the same component. Soft plastics like TPE offer diverse color options, transparent surfaces, and other appealing features, enhancing aesthetic design. This method eliminates assembly steps, shortens the molding cycle, reduces processing costs, and offers added value to the end-users in terms of design, quality, and functionality.
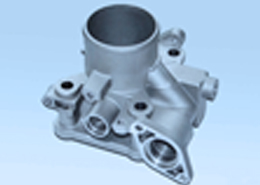
Injection molding is ubiquitous as a manufacturing process—in fact, the majority of plastic products in the world today are manufactured by injection molding. While it is an ideal technique for large-scale production needs, traditional CNC machined metal molds have prohibitive high costs and long lead times for low-volume production.
Adding two to five degrees of draft on surfaces perpendicular to the direction of pull will allow the part to be removed more easily and will minimize degradation of the mold.
11. To achieve tighter bonding between materials, consider the “stickiness” between materials and the roughness of the mold surface.
Nave ISK-8, Parque Industrial y Logístico Sky Plus, Avenida Mineral de Cinco Señores No.100, del Parque Industrial Santa Fe, Silao de la Victoria, Guanajuato, México
Download the blank mold insert design files—you’ll use them to create your injection mold design. The designs can also be easily scaled to accommodate most injection molders and mold frames. Alternatively, you can also design your own mold insert for the using the cavity diagrams of the master mold frames.

The exact approach to DIY injection molding will vary based on your desired design and volume, but these tips and tricks will help increase your success rate.
If designing for an aluminum mold frame, add .125 mm of extra thickness to the back of the mold plates to account for compression forces and to ensure a complete seal.
Select the first half of your object, and choose the boolean option under the Modifiers Menu. Select the object you’re cutting, and make sure that the “difference” operation is selected. Apply the operator, and do the same for the other side. It should look something like the image below. If you get stuck here, this tutorial on adding interlocking components to a design may be helpful.

8. It’s essential to consider whether the flow of plastic during the second injection might disturb the already molded product from the first injection, causing deformation. If this is a possibility, remedial measures should be taken.
LK-Mould Ltd.,
No.15, JinShen Road, Jin xia District
Changan Town, Dongguan
523850 Guangdong
China